Radon Mitigation in Denver Basements
Radon is one of the few invisible factors that can meaningfully affect both the safety and the cost of finishing a Denver basement. Colorado has some of the highest baseline radon levels in the country, and the Denver metro area sits squarely inside the EPA's Zone 1 designation, which means radon concentrations above the action level are common. For homeowners planning to finish a basement, the right time to address radon is during the project rather than after, and the difference in cost between those two paths is significant. This article explains why Denver homes carry higher radon risk, how mitigation systems actually work, what they cost, and why integrating mitigation into a basement finish project is almost always the better move.
Why Denver homes carry higher radon risk
Radon forms naturally from the radioactive decay of uranium in soil and rock. The Front Range, including the Denver metro, sits on geology rich in uranium-bearing minerals. As radon gas seeps up from the soil, it accumulates in below-grade spaces like basements and crawlspaces, especially in tightly sealed modern homes where natural ventilation is limited. The Colorado Department of Public Health and Environment estimates that roughly half of Colorado homes have radon levels above the EPA action threshold of 4.0 picocuries per liter, the level at which mitigation is recommended.
Denver's specific combination of soil composition, climate-driven stack effect, and finished basement prevalence makes the problem more acute here than in many parts of the country. Cold winters increase pressure differentials that pull soil gas, including radon, into the lowest levels of a home. The basements that are most desirable as living space are also the ones where radon concentrates most readily.
When radon testing should happen
Every Denver homeowner finishing a basement should test for radon before the project begins and again after the work is complete. The initial test sets a baseline and determines whether the basement finish design needs to include passive or active mitigation from the outset. A typical short-term test takes 48 to 96 hours and runs around $20 to $50 for a homeowner-grade kit, or $150 to $300 for a professional measurement.
The post-construction test confirms that the finish work, which often involves sealing the slab, adjusting ventilation, and adding interior pressure boundaries, has not changed the radon picture in unexpected ways. Skipping this second test is one of the more common omissions on Denver basement projects, and it is the wrong corner to cut. Radon levels can shift meaningfully after a finish, sometimes for the better, sometimes for the worse, and the homeowner has no way of knowing without measurement.
Planned mitigation during a basement finish
The most cost-effective time to install a radon mitigation system is during construction, before the slab is sealed and before finished walls block access to the perimeter. A properly designed system at this stage typically adds $300 to $800 to the project, because the rough-in piping, gas-permeable layer beneath the slab, and conduit for an exhaust fan all integrate into work that is already happening. If radon testing later shows the home needs an active system, only the fan and a small amount of electrical work need to be added.
This integrated approach is the same logic that applies to other below-grade systems. Just as it is far cheaper to plan plumbing rough-in during a basement finish than to retrofit it afterward, the same principle holds for radon. Reviewing what a basement finish typically includes in the current Denver basement finishing cost breakdown shows where radon mitigation fits naturally into the overall scope.
Retrofit mitigation on an already-finished basement
Mitigation can absolutely be added after a basement is finished, but the cost jumps. A standard retrofit active sub-slab depressurization system in a Denver home runs $1,200 to $2,500 installed, with higher-end systems and complex layouts pushing past $3,000. The cost reflects the additional work involved: coring through the slab, running suction piping through finished spaces or to the exterior, installing the exhaust fan, and routing the discharge above the roofline.
Retrofit systems are effective. A well-designed active sub-slab depressurization system reliably drops indoor radon below the EPA action threshold and often well below it. The downside of retrofit is purely cost and aesthetics. Visible PVC piping running up an exterior wall, a fan mounted in an attic or eave, and the slab penetrations inside the finished space are unavoidable on a retrofit and avoidable on an integrated install. Homeowners who plan ahead end up with a cleaner, less expensive result.
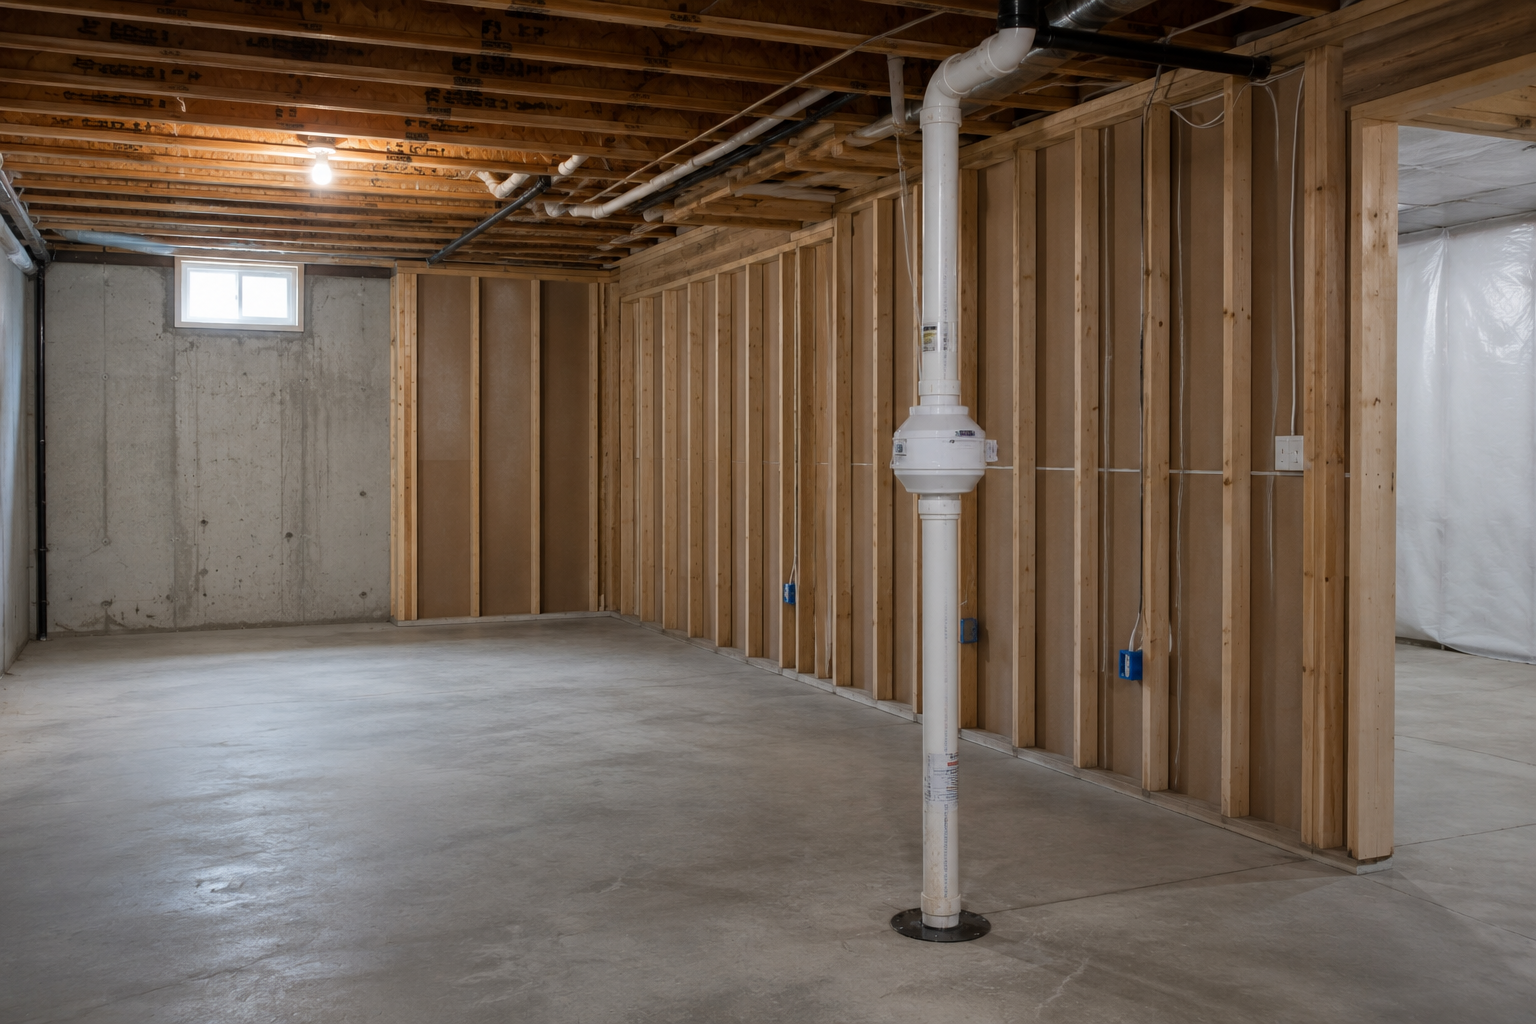
How active mitigation systems actually work
The standard radon mitigation system used in Denver is called active sub-slab depressurization. A PVC pipe is installed through the basement slab into the soil and gravel beneath it. An inline fan, mounted outside the conditioned space, pulls air continuously from beneath the slab and vents it above the roofline, where the radon disperses safely into the atmosphere. Because the system creates negative pressure beneath the slab, soil gas, including radon, is drawn into the pipe rather than into the home.
System effectiveness depends on several details that homeowners cannot easily evaluate from the outside. Suction point placement, pipe sizing, fan capacity, and sealing of slab penetrations all affect performance. A poorly designed system can run continuously and still leave radon levels above the action threshold. This is why the contractor selection matters as much for mitigation work as it does for any other component of the basement finish.
Common mistakes homeowners make
The first mistake is testing once and assuming the result is permanent. Radon levels fluctuate by season, weather, and home conditions. A single test in the dry, warm months may miss a winter spike. Long-term testing over 90 days or more gives a more reliable picture than any short-term test.
The second is waiting until the basement finish is complete to address radon. Every dollar spent on mitigation rough-in during construction saves three or four dollars compared to retrofit. The economics are stark enough that even a homeowner whose pre-test comes in below the action threshold should consider passive rough-in just to keep options open.
The third mistake is treating radon as a separate project run by a separate vendor rather than coordinating it with the basement contractor. When two different teams are responsible for slab penetrations, plumbing, sealing, and finish work, communication gaps create the kind of small mistakes that compromise system performance. The contractor finishing the basement should either install the mitigation system directly or coordinate closely with the mitigation specialist from the design phase forward. The same coordination logic applies to adding a bathroom to a Denver basement, where plumbing and slab work need to be sequenced together to avoid rework.
The fourth is ignoring radon in older basements that are not being finished. A homeowner who lives with a finished basement built ten or twenty years ago without mitigation should test, even if the basement appears comfortable and dry. Radon does not present visibly or through any noticeable symptom in the short term, and the only way to know is to measure.
How mitigation fits into the overall basement project
Radon work touches the same tradespeople, sequencing, and permit framework as the rest of a basement finish. Permits in Denver typically require radon-resistant features on new construction and recommend them on remodels. Reviewing Denver's current remodel permit requirements alongside a basement finish scope reveals where mitigation tie-ins are required versus optional.
Timeline integration is the other reason planning matters. A radon system installed during construction does not add days to the project. A retrofit installed after the basement is finished can take two to four working days in the home and involves more disruption than most homeowners expect. For households planning to use the basement for bedrooms, especially under the same code framework that drives egress and ventilation requirements, addressing radon during the build keeps the whole project moving on a single timeline rather than splitting it across two phases. The general sequence of a Denver basement remodel includes natural windows for mitigation work that disappear once the project closes.
What the right approach prevents
Radon mitigation is one of the simplest, lowest-cost, and most important interventions a homeowner can make during a basement finish in Denver. The hard part is not the system itself; it is the sequencing. Done at the right time, it costs a few hundred dollars and disappears into the project. Done later, it costs five to ten times as much, looks worse, and creates exactly the kind of incremental disruption that a well-planned remodel is supposed to avoid.
For Denver homeowners about to finish a basement, the right move is straightforward. Test before design. Plan for passive rough-in regardless of test result. Activate the system if testing warrants it. Test again after completion. This sequence costs little, protects the household, and prevents the much larger expense and frustration of revisiting the basement six months after the project closes.